 I’ve been braiding all kinds of weird stuff in my hair since I was about 16. I’ve had synthetic dreads, wool, foam strips, bits of Rexlace, heat shrink tubing, CAT5 cables and curly phone cords in more colours than Crayola can pack. So in lieu of the scores of questions I get asked about my capillary arts and crafts projects, I thought I would post a short guide to creating a common type of extensions: roving wool dreads.
Fake hair is luff *.
Oh sure.
It’s also an arduous, pain-stakingly slow and tedious process. Regardless of your experience level a few things are certain: you will burn yourself steaming dreads, they will tangle and tear, and you will waste hours trying to correct a mistake only to have it fall apart in your hands. And after all that work, you’ll have tumbleweeds of matted hair blowing around your house for weeks after.
Making fake hair sucks. Even if you’re a pro at this, it’s boring and it takes forever. There are professional places that will gladly do this kind of work for you; they charge professional rates. I promise you, after attempting to make a couple synthetic dreads yourself, you’ll find their prices very reasonable. I won’t even begin to describe the complications of installing them yourself. If you can afford it, hire a pro. If you’re feeling brave, read on.
Why wool dreads?
A few different reasons.
The good
I find them easiest to make. You don’t need to backcomb wool, the fibres are already matted. This takes down your production time significantly. Wool doesn’t require as high temperatures as synthetic hair so you’re less likely to inflict serious burns. It’s also more readily available and cheaper to order online than synthetic hair.
Wool is a lot lighter than synthetic hair which makes a serious difference when you’ve got a hundred of them dangling from your scalp. Anyone’s who’s worn extensions will tell you tales of the dreaded itches, scalp massages and neck pains.
The ugly
On the down side, wool dreads soak up ten times their weight in water so it’s inadvisable to go swimming with them. They gather pretty much anything they come in contact with, brambles, dirt, smoke and ants, so they get dirtier than their synthetic counterparts. Washing your hair is a chore, you will need to dry them thoroughly after, preferably by letting them cook in the sun. In my city, that’s a luxury you an afford for like 6 weeks of the year, which means hours of tedious blow drying. Failure to do so, results in that dreaded wet dog smell.
I tend to replace wool dreads more often than synthetic ones, but like I said, they’re a lot easier to make which gives you plenty more opportunities to experiment with colours, widths and densities. Believe me, you’ll want to, it’s addictive.
The boring
Yep, making dreads is boring. And it takes forever. Maybe there’s a level of zen disassociation that I’m unable to achieve that makes this process enjoyable. Maybe it just sucks.
The most important material you should acquire before embarking on this journey is media.
Hours and hours of stuff to watch or preferably listen to since you do have to pay attention to what you’re doing with your hands. Get an audio book of War and Peace. Download 26 seasons of Simpsons. Hey you know that quasi-terrible show everyone’s been recommending? This is the time to watch it. Anything to keep your sanity.
You’ll be glued to your dread making station for a long time. Once you have a good workflow the process will get steadier but it’s still dull work, so find some entertainment.
Important stuff you’ll need
Wool. Obviously.
You’ll want giant fluffy bags of roving wool. The stuff you use for felting. You can order it on eBay in every colour and quantity you can imagine. You’ll need anywhere between 1 lb. to 2 lb. depending on how dense your hair is and how full of a crown you want to achieve.
If you’re lucky and live in Toronto, Romni Wools is the ultimate hook up for all your yarny needs. Oh boy, the looks I get from those folks even after a decade of going in there are priceless. Roving wool bags are in the basement to your immediate left, but by all means if this is your first trip, feel free to browse their yarn selection.  Occasionally you’ll find balls of spun yarn of the perfect thickness to look like dreads. In that case, cut into desired length, braid into hair and close this browser tab. You’re done.
Seriously, all fake hair is luff.
Roving wool dreads however do look more natural and you have a lot more control over the output which is a lot of fun. In the illustrated example I used 1 lb. to make about fifty 1-2 cm thick dreads and my head is plenty fluffy. That’s the minimum I would install however, they slide around with time and form awkward gaps that you have to craftily braid around. Ideally you’ll want to aim for 60-80 dreads. You will also need:
- scissors
- a knife
- a shallow ceramic or plastic bowl big enough to fit both your hands
- soap
I’ve seen a lot of guides recommend natural ingredient soap bars because they supposedly matt the wool faster. I’ve used everything from dish detergent to Dove “beauty bars” to delicious home-made Brazen Razor soaps. I hardly noticed a difference in the dread output – but my fingers were not too thrilled about being boiled in Dawn dish soap for 6 hours, so if you can hook up a natural, creamy and delicate soap, do so. The more important thing is that the water is very hot so you’ll need:
- a kettle
- a towel
Or possibly two of each. You will need a steady supply of scorching hot water and something to absorb the excess. If you’re really scared by now, you can invest in a pair of thick rubber gloves to dunk the dreads initially, but you’ll still need your bare finger tips to roll them properly after, so I suggest just sucking it up and scalding yourself a little. Fake. Hair. Is. Luff.
If you’re planning on installing the dreads yourself you will also need
- Elastics – easier said than done my friend. The quality of the elastics you get directly corresponds to the number of angry and frustrated screams you will emit during the installation process. Most drug store elastics are awful – these things in particular, will drive you mental. For a lack of anything better, you can use three or four each time, but I sincerely recommend visiting a specialty store and getting some decent elastics. Cosmetic World in downtown Toronto has a good selection and they can order a bunch of colours if you give them advance notice.
- A rat tail comb – they look like this. Any comb will really do, but rat tails make it easier to separate your hair for the box braiding process
- Mirrors – plural. You’ll need to see every angle of your head to part your hair properly and ensure proper coverage
- Minions who can braid – optional but always welcome. This is a lot less stressful with a couple hands helping you. Time to call in that favour from that move, or treat your best friend to 50 bucks worth of Chinese food takeout.
Now the fun part
Hokay.
So you have several bags of fluffy wool, a shallow bowl, some soap and a kettle full of boiling water.
Spread out a towel over a flat hard surface. You can do this on a table if you have a chair that you can comfortably sit in for the process, or do it on the floor and sit on a pile of pillows. Either way, make sure the surface is clean and clutter free. Whatever is on it will get rolled right into your dreads.
If you have cats, this is the part where you shoo them into another room and close the door. I learned that the hard way.
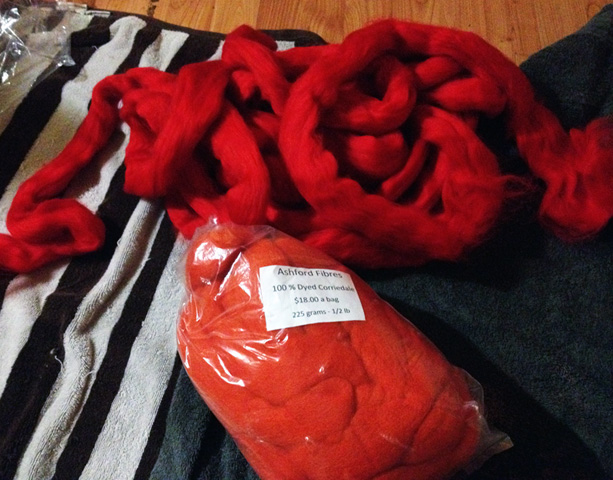
Open a bag of wool, the contents should be a long roving snausage that you will need to break up in the desired thickness and length. Do so one at a time and very carefully, the wool will fall apart if you pull on it too hard. I usually make double-enders – what means the dread is finished at both ends and I start with double the length I want each strand to be, then install it by folding it in half and looping it through my hair section.
Wool shrinks down to about a quarter its dry size once soaked and rolled, so experiment with the first few sections and decide how thick you want them to be. You can use scissors to cut the wool, but I personally prefer gently tearing it apart to leave nice tapered ends.
Dissolve a few pieces of soap in boiling water.You’ll want to use enough soap to get to water murky and mix it very thoroughly. Soap is the agent that binds the fibres together and then dehydrates them to pull the weave tighter and make each dread sturdy.
The water should also be very hot, so work with small quantities of the mixture so you can continue to add boiling water and extra bits of soap to maintain the temperature.
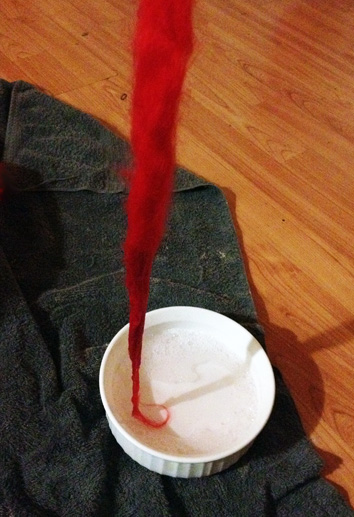 Take your desired strand and dunk it the soap water. Make sure it’s soaked thoroughly, run your hand carefully down its length to drain excess water and saturate it. It will burn. Like hell. Grit your teeth. Wrap your finger around the middle point of the dread and holding it taut, lay half of it down on the towel.
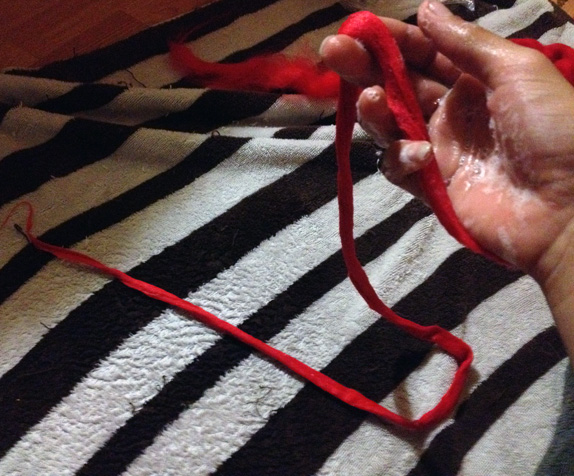
Roll.
Roll some more. 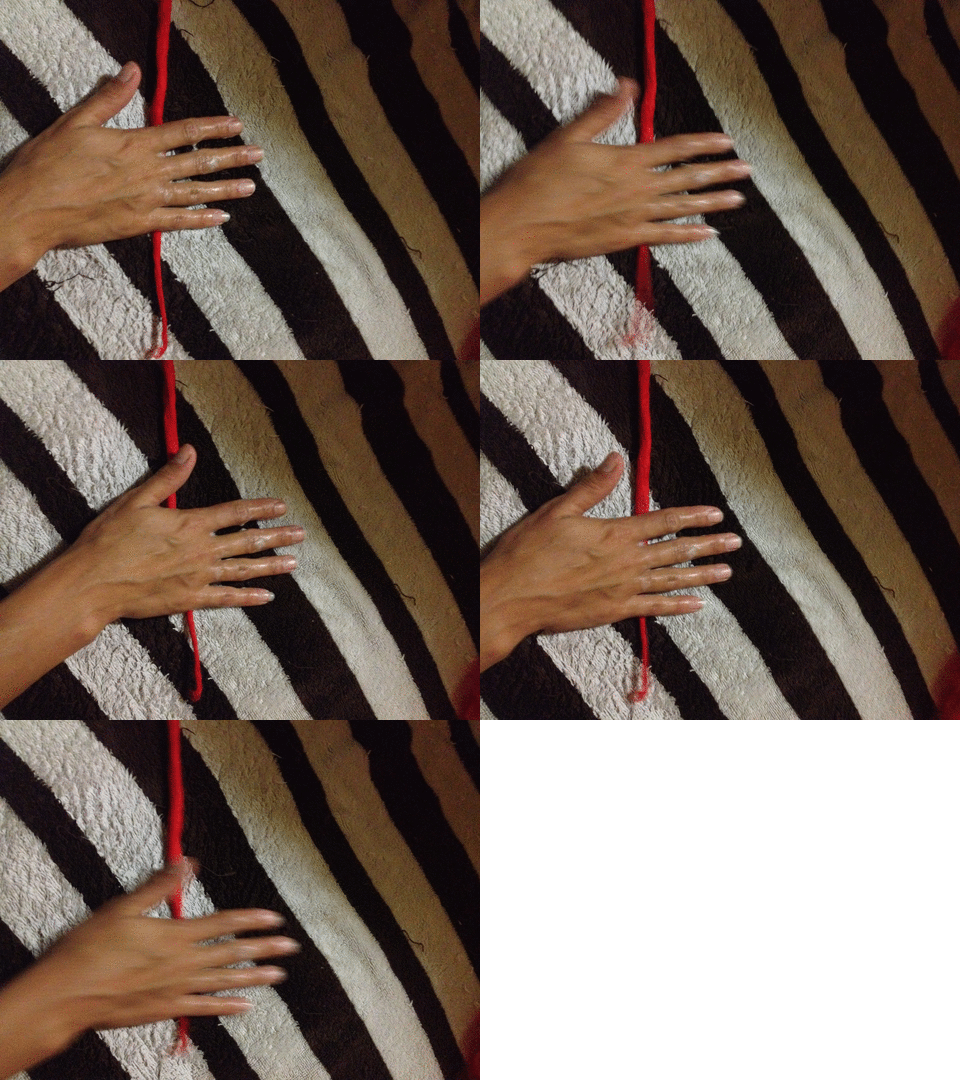 Now let go of the middle section and repeat the process for the other half of the dread. Watch the direction of your roll, you’ll want to maintain the same spin on the yarn so it doesn’t fall apart.
Keep rolling. 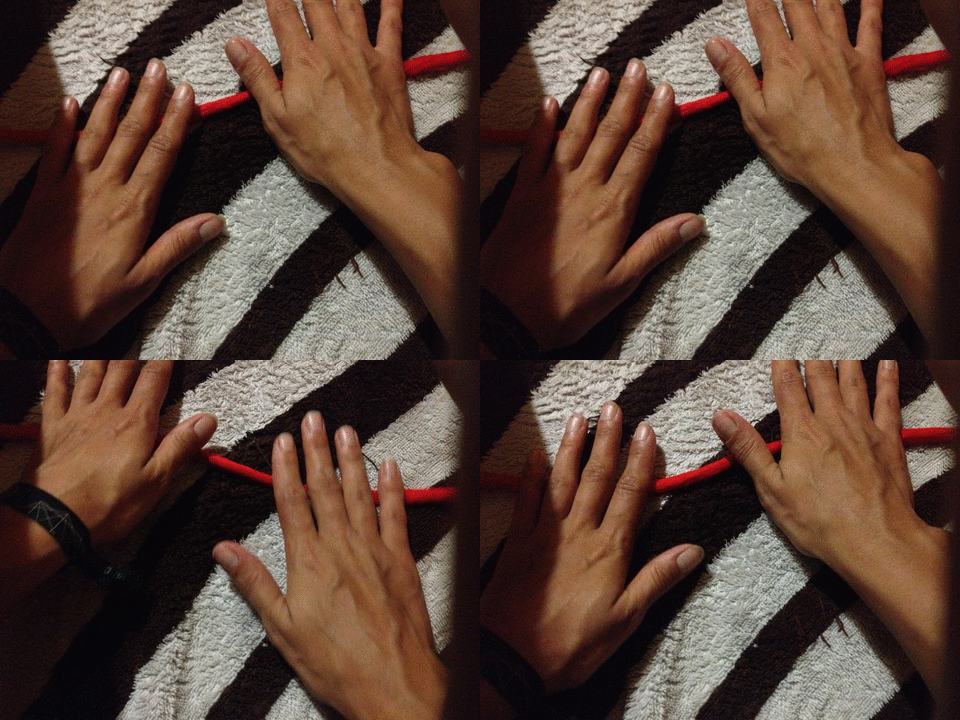 If you’re doing this right, by dread 20 you should have blisters.
Mmmyep. Fake hair is luff.
So you’re going to keep rolling like this until you run out of patience or wool. It’ll probably be the former. I once marathoned a set of 70 wool dreads in 8 hours of continuous work with just bio breaks. It was some fresh hell, but they looked gorgeous, and I’d do it all over again. 
If your rolling was half-hearted, you may notice that once the dreads are dry, they’ve fluffed back out and they seem brittle and way too puffy. If that’s the case, repeat the hot water process. Again. And again. Until you learn to do it right the first time. Experiment with quantities and types of soap, if by the second pass they’re not tightly knit, you’re probably not using enough product.
Get fancy
You can also play around with blends of different colours of wools. Some bags come pre-dyed in several shades, or you can dye it yourself. I’ve attempted dip dying them with India inks, Kool Aid (don’t judge me, it was 9th grade), using a hair dye bath or actual wool dyes from crafts stores. All of these techniques create really unique effects and work fairly well, but will add a few steps to the process. If this is your first rodeo, just roll your bag of wool and see what comes out naturally.
To mix pre-dyed wool you may want to use felting needles to mat each strand dry and ensure an even blend before rolling the dread. If you want to dye the wool yourself, make the dreads first then dip them in the dye or boil them with it; trying to dye the whole bag of unspun wool at once will yield one massive useless dread.
Install them
Now you have a bunch of soggy dreadies. They’ll need to dry. Hang them somewhere clean preferably in the sun to shrivel up. This will take a couple days: just enough time for your burn blisters to heal.

In the meantime, go source some proper elastics. Seriously, I can’t stress this enough. Crappy elastics will be the bane of your existence.

Those cheap Goody Ouchless mini-plastic elastics you can get at Shoppers are awful. You’ll need to use 3-4 each time because they snap easily and they don’t withstand washes, temperature changes and sun which means you’ll shed little wads of gummed up plastic all the time. Your best bet is to visit a hair supply shop like Cloré Beauty Supplies and get the thicker, rubber elastics they sell – they come in a whole bunch of colours and they’ll save you time and money.
You will want to box braid your hair.
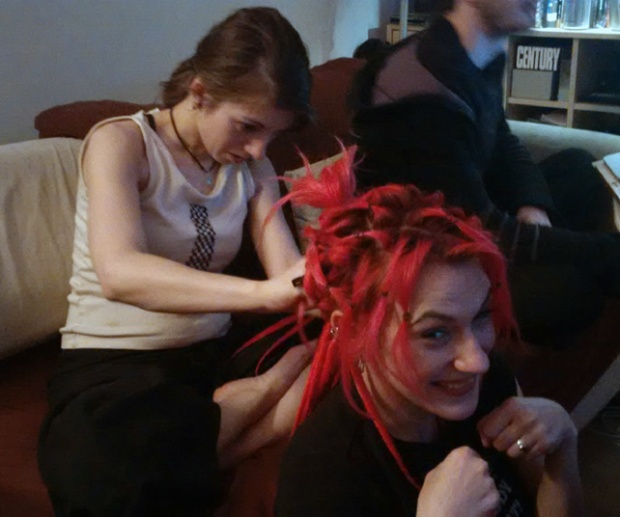
What this means is splitting your hair into small square sections; each one of these will be a separate dread. If you have extendible eye stalks this will be a breeze. Unfortunately you probably don’t, so this is the part where you secure human minions to help you out, or book a day off on all your calendars and get ready for a sore neck and fingers.
- Part your hair in small sections and put an elastic at the base of each one. You want the elastic to be about an inch from your scalp and fairly mobile. If you make the sections too tight, the next step will hurt like hell.
If you’re lazy and have only made about 50 dreads for your whole head, you can cheat a little. The top section of your hair is really the most important for a full look, which means you can get a little lazy on the sides and in the back by making the sections of hair a little bigger.
In fact, I much prefer leaving the back part of the head lighter because wool gets quite hot and all that volume makes me feel like I’m hauling a boneless sheep on my shoulders. At any rate, the front few rows around your face should be quite tight. Try to secure as many of the baby hairs as possible and avoid tangling the sections together with fly aways.
- Starting from the front, you’ll want to insert a dread through the gap between the scalp and the elastic in each section of hair. If you made those sections to tight, this step may be punctuated with yelps and tears. Pull the dread through the hair section up to its mid point.
- Take the hair strand and split it in two section; using half of the dread as the third strand, braid together.
If the hair colour matches the dread, I usually braid very tightly to blend the two in. If the hair is a different colour, rather than trying to mask the contrast, I braid with looser stitches to create a swirled effect that will transition nicely.
- Either way you do it, secure the end of the braid with an elastic.
You now have one dread installed. Was that fun?
- Now repeat. Ad-freakin-nauseam.
Pics or it didn’t happen
You will notice the distinct lack of process photos in this portion of the tutorial. That’s because installing dreads sucks. It sucks even worse than scalding your fingers making them. I dread (last pun, I swear) this process more so than any of the rest, so the last thing on my mind is “Hey I should take detailed pictures of my torture for a blog post“.
The last time I did this, I started 10 hours before a 5AM flight to Mexico. I hadn’t even started packing. I rushed, and winced in pain with every hastily inserted dread and braided until my fingers were so sore I couldn’t update my Facebook status to whine about it. It took 6 hours. A personal record, I might add.
This is the part again where, if you can hire a professional, do so. If you’re a dedicated, I recommend a solid dose of pain killers before starting the process. Depending on how skittish you are about hair pulling, even a professional installation will hurt a little. Anti-inflammatories also work wonders for the post-installation soreness.
Serious business
If you’re absolutely terrible at following written instructions, here’s a handy video illustrating the process. In fact, YouTube is full of tutorials on how to make and install synthetic and wool dreads. Dread extensions are serious business. I have nothing but respect for anyone who can do this professionally because it can take a saintly level of patience and callouses harder than a rhino’s hide. To find local dread craftsmen and women reach out to your friendly neighbourhood weird kid and ask them about it. They probably have a friend or sibling who will help you out.
There are also pro salons that do this type of work along with all kinds of other knotty creations. For example the good folks in Montreal have the legendary Studio Sundari open for business all week long. I’ve also ordered synthetic dreads from the amazing Acid Rose Designs, she was fast, responsive and the blended dreads she makes are absolutely beautiful.
Resources
Let’s quickly reiterate the resources in this guide for your convenience.
- Source wool at Romni Wools in Toronto. They will ship if needed, lots of cities have knitting supply shops (because hipsters) or otherwise scour eBay for roving wool.
- Get some natural quality soap because you’ll be knuckles deep in it for hours and you want your dreads to smell nice once you’re done. You should hit up Miss Saucy at Brazen Razor because shameless plug is shameless
- Get a Netflix account. Seriously
- Hit up Cloré Beauty for proper hair elastics for the installation. Shoppers brand elastics are not your friend. Cosmetic World in downtown Toronto also has a good selection and they can order a bunch of colours if you give them advance notice. You’re welcome.
- Youtube the process – some people do well with written instructions like above, but it helps to kinda see the process. Also the weird kids of the world need hits on their videos, so watch someone do it first.
- If you’ve failed miserably at all this, it’s time to call in the cavalry – book an appointment with Acid Rose Designs in Toronto or hit up Montreal’s Studio Sundari because they know what they’re doing. If you’re not in this neck of woods, this is your opportunity to make a new friend and just ASK THEM – one in four freaks (citation needed) has experimented with fake hair and they can tell you all about it. Otherwise, practice Google-Foo and find a dedicated local place.
* It’s a LiveJournal thing. Don’t worry about it 🙂


Thank you so much for the detailed tutorial! I’ve never tried to make dreads out of anything but, well, real hair haha. I didn’t realize how nice the woollen ones looked.
This is definitely going on my list of summer projects 🙂
LikeLike
Thank you, I’d love to see how yours turn out!
Love your nail art tutorials by the way, you’ve inspired me to create some funky stuff. I’ll post them soon 🙂
LikeLike
Awesome post. Love the pro’s and con’s list.
LikeLike
Thanks so much, I tie mine at the top rather than use elastics but find they pull out easier so will try your method next time.
Much love x
LikeLiked by 1 person
Thank you – I tie mine at the top and bottom rather than using elastics but will try your way next time as I find mine can fall out easily.
Much love x
LikeLiked by 1 person
Hi there! 🙂 My name is Jessica.. I just made my first set of wool dreads about two weeks ago, and they came out great!
I find that they are becoming flat, I assume from sleeping and leaning my head against things, do I just palm roll them to round them back out?
They also seem to be getting tighter and thinner as time goes on.. Is that normal?
What do you recommend for the itching?
BTW, I have real dreads as well.
LikeLiked by 1 person
Congrats on your dreads Jessica, post a pic I’d love to see them!
They normally shrink a bit with wear, but if you prefer a chunkier look, try to remember how much wool you used and double it for your next set.
Flat dreads happen when the core of the dread isn’t matted together tightly enough to endure all the squishing. You can soak them in hot water and soap and roll them again, against a flat surface – depending on how long they are you might need a helping hand. Drying will take some time, but they’ll regain their shape and smell clean 🙂
The itching is inevitable, have you tried using some dry shampoo to rub your scalp? If you can find one that contains mint, the cooling effect will provide longer relief.
LikeLike
I love your blog. It is so true. I make and sell any a all types of wool dreadlocks. Very boring and time consuming but I love it.
In the middle of making 120 DE dreads not sure if I will EVER be done.
LikeLike
That’s really cool, do you have a website or gallery of your work?
What kind of dreads are you working on a the moment?
LikeLike
Hello! Thanks so much for the great tutorial. I’ve always wanted to play around with tie-in dreads and entertained making my own synth set, but made two and wanted to die! lol I’m a knitter and use wool 100% of the time, so when I discovered people made felted dreads that renewed my desire! I’ve felted a bodice before out of Blue-faced Leicester, wool that really doesn’t like to felt, so I think I’ve got the expectations set better this time around. I’ve got a pound of undyed Corriedale (re your roving picture: I think you called it ‘coriander’ 😉 ) and some Merino, Finn and Polwarth, for experimentation purposes, The ladies at my local yarn store said Corriedale would felt the best, but I’ve never really liked it much, so I’m hoping Finn or Polwarth might felt correctly. They said merino doesn’t like to make cylinders, it instead likes to flatten out, and it pills super quickly, so not expecting much there. I’m going to attempt to do this all by Halloween (HA!), complete with a hand-painted dye-job. Wish me luck!
LikeLike
Haha “coriander wool” – autocorrect strikes again, I can’t believe nobody mentioned that edit before. Thank you for that and the extra tips here! Would love to see what you come up with, post pics if you can 🙂
LikeLike
some truly interesting info , well written and broadly speaking user genial .
LikeLike
I’m just getting into the wool dread game..or dread game period truth be told.. any thoughts on carded wool? I have a nice ol bag of fresh(slightly sheepy smelling) undyed merino roving wool that I ordered online and the seller included a little sample of their carded sliver wool pre-dyed oatmeal. Speaking of sheepy smelling, do you find that the soapy dunk helps get rid of the “earthy” smell? I’ve seen online where some crafters use a baking soda bath instead of soap for this reason and thought I’d ask! Thanks for putting together such an easy to follow DIY!
LikeLike
Hey Ginny, glad you found the article useful! Is your carded wool in big flat sheets? In theory it’s the same stuff as I use, so you should be able to use the same technique here, you may just have to do some more cutting to get it in the same long strands as I have.
As for the sheepy smell, I really hope your wool isn’t actually mouldy because that will be unpleasant to work with and might even trigger allergies if you’re sensitive. The soap I recommend using is unscented, natural ingredient based so it doesn’t alter the smell of the wool – but all the hot water and rolling is effectively washing your material so it should remove any unpleasant smell in the process. If you want to be extra through you can use a couple drops of essential oil in your soapy mixture – clove oil is quite strong, so it will definitely mask other odours.
You could also try unspooling your wool and laying it out in the sun for a bit, that will ensure the wool is dry and bake any unpleasant smell out of it.
LikeLike
can you add length to already set wool roven dreads?
LikeLike
Yes, but it’s not easy. Once the roving dread has solidified, you can’t just roll more wool on top of it. Your ends will fall off. What I’ve done instead is use a pet hair brush to destroy the bottom of the original dread, and then use the same technique (soak roll roll) to add new wool to it. Make sure the wool extension is tapered and that it matts into the old length. Once dry from the first rolling, give it a good tug to make sure it’s in there securely. If you feel comfortable with the technique, using a felting needle is the best way to make sure the new ends aren’t going anywhere. Just don’t stab yourself 😛
LikeLike
Thank you! Your a great help love your blog 🙌❤️
LikeLike
Do you have any helpful tips on how to get two different colors of pre-dyed together for an ombre effect?
LikeLike
Hm… no I haven’t tried that, but like extending existing wool dread length, I would think you’ll need to go at it with felting needles or a crochet hook to make sure they’re well matted. What I’ve done for the ombré look was dip-dye my dreads. I made a set of white dreadies with the normal technique, then stuck the tips in a bath of red dye and let them soak overnight. The next day they had fluffed out a little, so I re-sealed them by hand rolling with just hot water, no soap.
LikeLike
Hello! I think I have an issue. My dreads ended up becoming stiff. What am I doing wrong in your opinion? Furthermore what can I do to make them smooth? Thank you very much!!!
LikeLike
Hm, I’m not sure what happened there. Did you use soap when you were matting the wool? Maybe the product hasn’t washed out completely yet. Have they gotten wet or come into contact with dirt or dust? I suggest posting a photo so we can have a closer look 🙂
LikeLike
what if you can’t find wool roving? will normal wool work as well?
LikeLike
So I’ve been using synthetic dreads for ages now and wanted to try wool dreads because to be honest? They seem easier to make and compared to synthetic plastic dreads, they are. However I did come across something when I was boiling my new hair. I’m not a fan of my hands being out of commission so I pulled an old trick I used to bust out in a previous job; Put on a pair of woollen or cotton gloves, then pull on a pair of latex free gloves (Those blue powder free ones are the ones you want). You’ll be able to reach right in to your boiling water with your newly gloved hands 🙂
LikeLike
This is awesome! Thanks for the tip!
LikeLike